Here at Neowin, we celebrate World Backup Day every year on March 31st. For many people, that simply means copying data to a cloud service like Google Photos or Amazon Photos and calling it a day. Others, however, prefer keeping data on their local network to speed up a recovery when necessary, or to easily share with friends and family. It's this latter group that could benefit from a NAS device.
Today I'm going to look at the QNAP TS-233, a two-bay NAS device that can be used as a secondary spot to store your data. While some may need a device with more drive bays, those with more modest capacity concerns could definitely benefit from this relatively inexpensive $199 box. Let's take a look and see if it's something you should be considering for your home network.
Specifications
The QNAP TS-233 is immediately unique from previous NAS devices I've looked at in a couple of different ways.
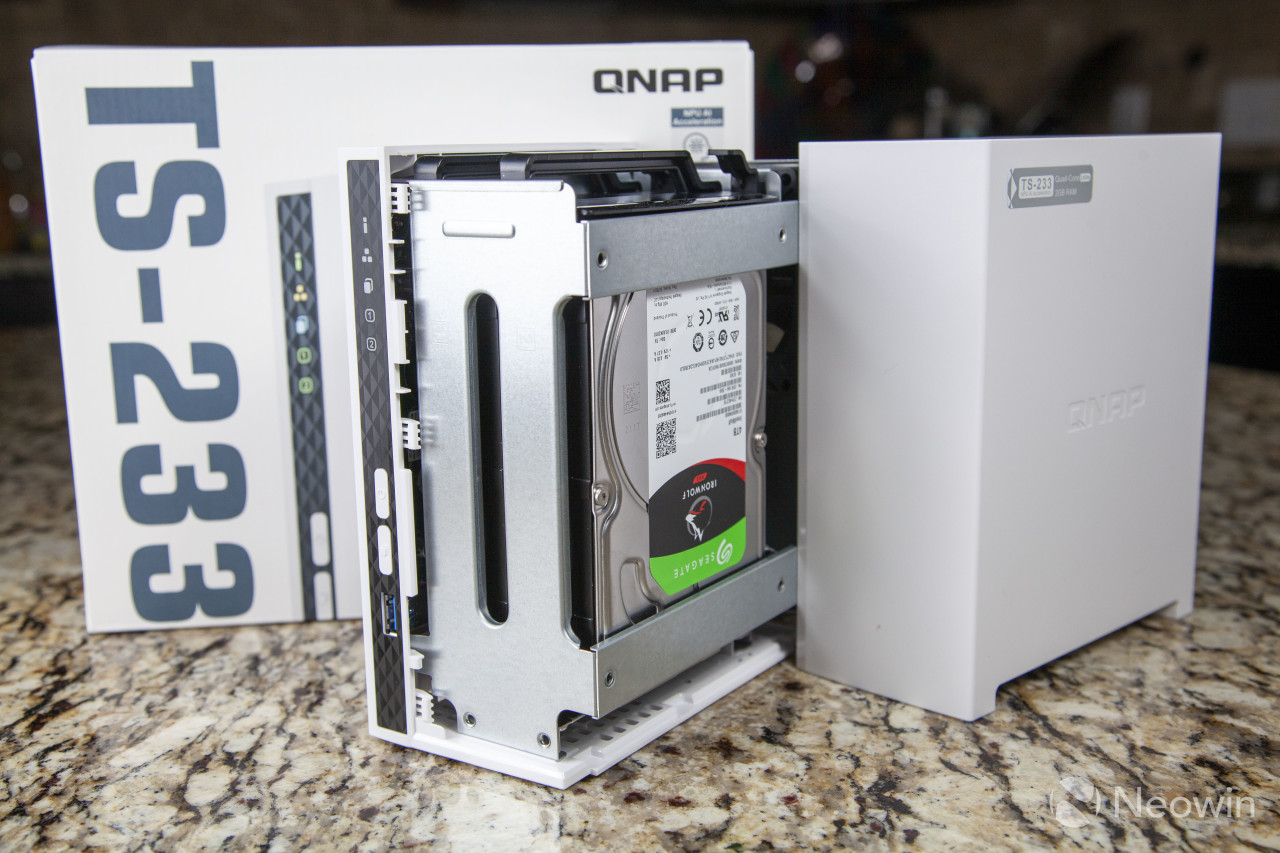
The first thing you'll notice is that the device is a stark white with a sleek carbon fiber-like black stripe on the front. In a world where most of the devices I've reviewed are a plain black box, this was a welcome change of pace. Many people won't care, since server devices frequently get hidden in a closet somewhere, but for those who keep their electronics on display, the TS-233 just looks nice. In addition, it's not glossy, so it doesn't attract fingerprints or cat fur, which is handy if you have pets.
The second thing you'll realize is that there's no direct access to the drive bays. This makes the device look a lot nicer, as well as adds protection from someone accidentally (or on purpose!) removing a drive from the NAS, but it also means you have to remove the cover when you replace the drive. Although the drives are hot-swappable, having to remove a screw from the bottom and exposing the device's innards seems like more of a risk than simply shutting it down.
| CPU | 64-bit ARM 4-core Cortex-A55 2.0GHz processor |
|---|---|
| Encryption Engine | Yes |
| Memory | 2GB, not expandable |
| Disk Capacity | 36TB (18 TB drive x 2) |
| Network | 1xGbE (optional 5GbE/2.5GbE with adapter) |
| USB Ports | 1xUSB3.2Gen1 (front), 2xUSB2 (back) |
| Buttons | Power, Reset, USB Copy |
| Size (H/W/D) | 7.43 × 3.55 × 6.15 inch / 18.87 x 9.02 x 15.62 cm |
| Weight | 2.45 lbs / 1.11 kg |
The inclusion of the ARM processor shows that QNAP does not intend the TS-233 to be a workhorse, it is geared more towards simple storage and basic tasks. In addition, since the device has a maximum of 2GB of RAM, you're somewhat limited on what you can run. For example, after installing Container Station, you're greeted with a message indicating there could be issues with less than 4GB of RAM, meaning Docker and LXD are probably off-limits with the TS-233. That said, it's only $199, which is a great price for someone with modest requirements.
The front of the TS-233 has a single USB 3.2 port and two buttons: one for power, and one to copy data from the aforementioned USB port.
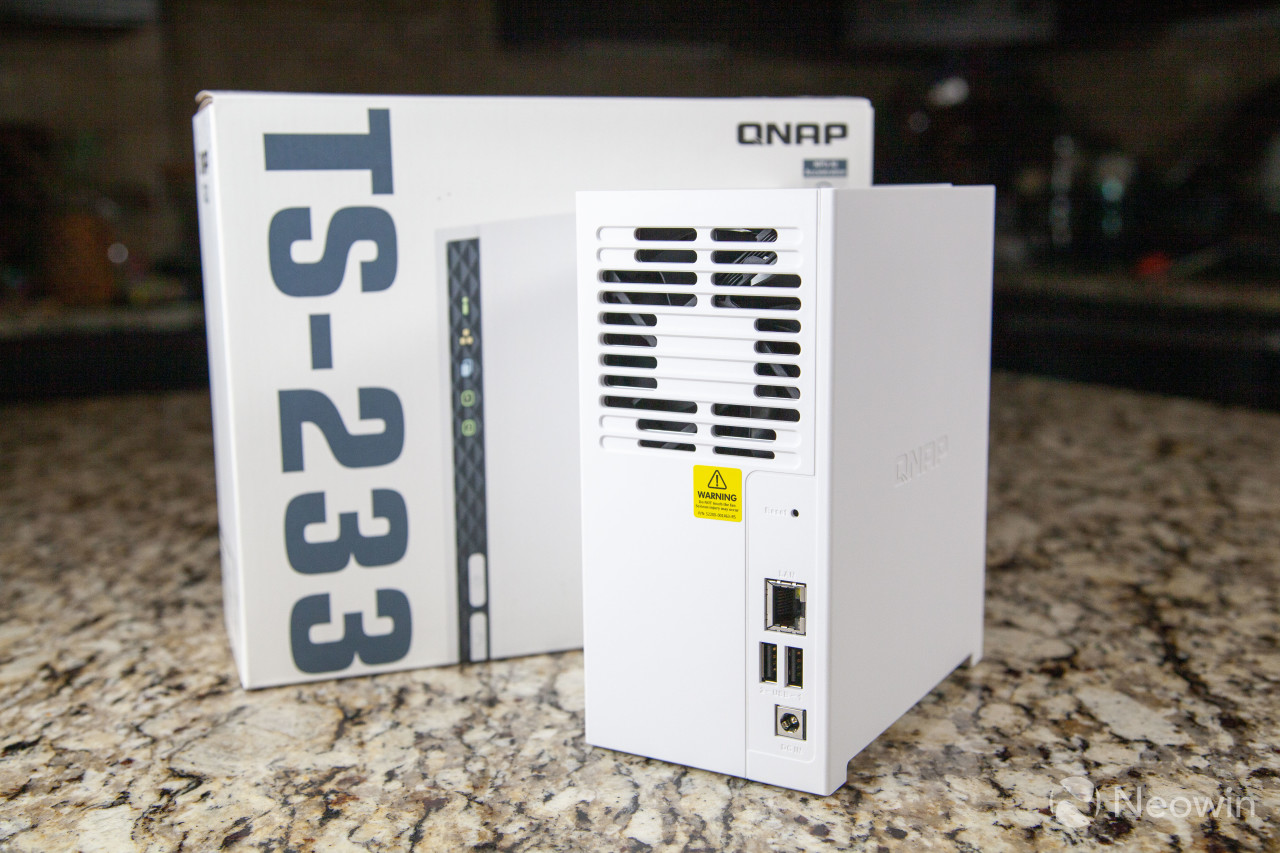
When you look at the back, you'll see everything you'd expect: A single Gigabit Ethernet port, two USB 2 ports, and a single reset button, along with a single 80mm fan and the barrel connector for power.
Hardware Installation
Setting up the QNAP TS-233 is a relatively straight forward process, although slightly more work than most other NAS devices due to the fact that the drive bays are not exposed. As noted earlier, this is both an advantage (no risk of accidentally pulling a drive from a working system) and disadvantage (although technically hot swappable, it seems a little riskier to tilt the device around with spinning disks inside).
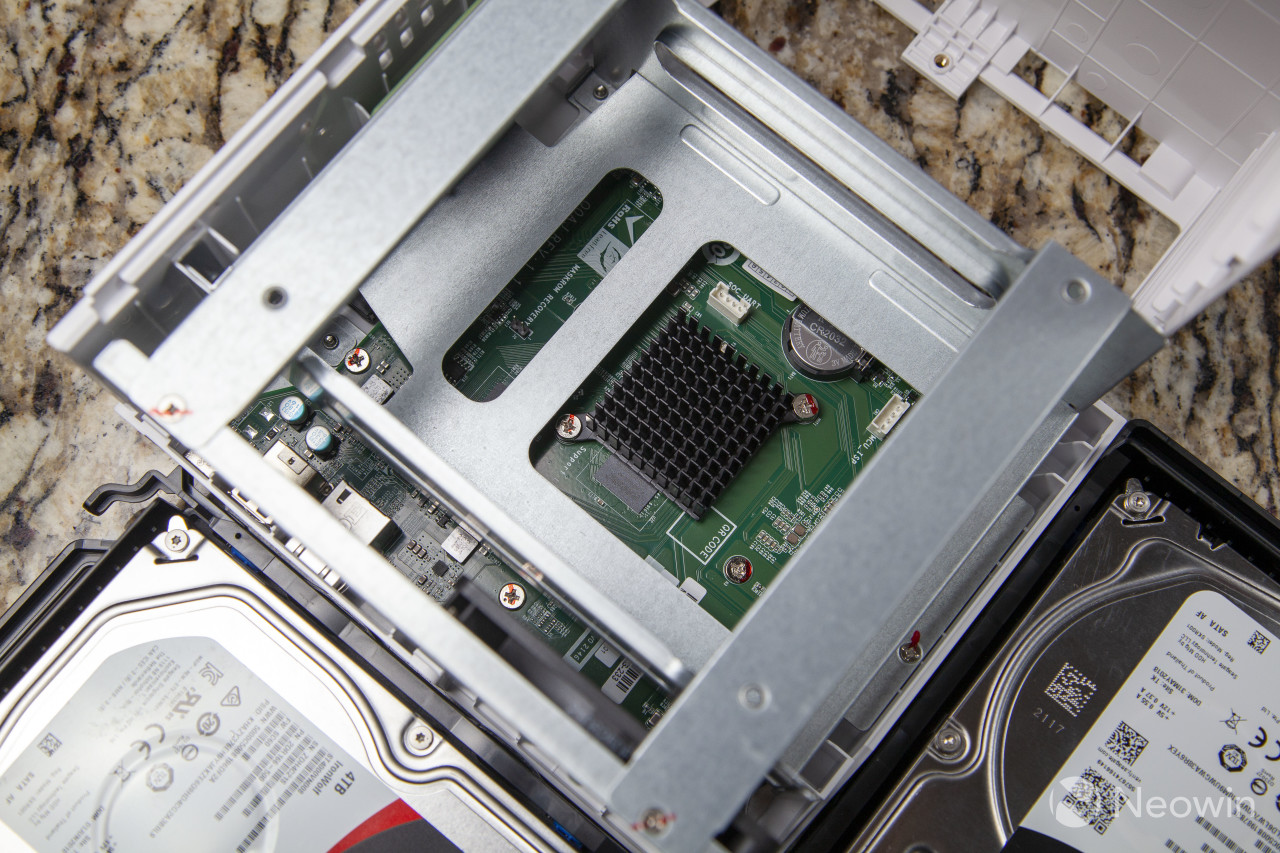
That said, access to the drives is controlled by a single screw at the bottom of the device. Simply unscrew it, slide the case off, and you have access to two normal, tool-less drive sleds.
From here, simply pull out the sled, snap your drive into place, and insert the sled back into the NAS device. I will note that it was a little strange plugging the drives in straight down so that they're spinning 45 degrees off axis from where they typically do, but there didn't seem to be any issues with this, it's just a little different.
One weird thing I ran into was that it was a little difficult to get the first drive bay into the slot. It felt like the channel wasn't completely smooth, and this was definitely unrelated to the drives or sleds because when I swapped them around, the problem stayed with the first bay. It's not really an issue, it just doesn't glide in as easily as it should.
After that, simply screw the base back together, plug in the power supply and an Ethernet cable, press the power button, and you're ready to go.
Initial Setup and Configuration
The major advantage to a dedicated NAS device from a company like QNAP is the streamlined interface of QTS that makes most tasks extremely straight forward.
Once the QNAP TS-233 is powered on, simply point your web browser at the device (you can download the QFinder Pro app to your desktop to find it if you need to). You'll be prompted to click a button to install the latest version of QTS. This process takes several minutes, after which you're asked to name the device, create an admin user and password, and setup the time zone and IP address (static or DHCP). After waiting a few more minutes, you're presented with the TS-233's login screen. You can see all of the steps of the initial installation in the above gallery.
Performance
As with all of my NAS reviews, in order to test performance and bypass the PC as much as possible, I used OSFMount to create a 4GB RAM disk and then used Robocopy to test throughput between my desktop and the QNAP TS-233. The volume on the NAS was created as a RAID-1 (i.e.: mirrored) filesystem. Keep in mind that I have not looked at many 2-bay NAS devices recently, so the graphs aren't fair comparisons and are included to give you a visual representation between classes.
My first test is copying a large, 3GB file to and from the NAS device. Copying a large file is easier for a disk because the drive can read and write sequentially, so performance is always better with these types of tests. Surprisingly, I received some mixed results here. Copying from the NAS was good, giving me performance of roughly 111 MB/s, which is pretty close to the theoretical maximum speed of Gigabit Ethernet. However when copying the same file TO the NAS (from the RAM disk), performance dropped to only 61 MB/s. I received these low speeds even after rebooting both the NAS and the PC, in order to provide a fresh baseline.
When testing small files, I took 3GB of MP3 files and copied them back and forth between the RAM disk and the QNAP TS-233 NAS device. Here, results were more in line with what I expected. When copying from the device, I saw a respectable 80 MB/s and when copying the files to the TS-233, I saw 49.3 MB/s.

What's even more curious is that these results did not match up with the CrystalDiskMark tests I ran. When using that tool, the read results of the large files was on par, but the write speed was much higher in the benchmark test, with results similar to the read speeds.
One Button Backup
In addition to the power button, the QNAP TS-233 also has a copy button on the front of the device. This allows you to easily copy files either to or from a device connected via the USB 3.1 port at the front of the NAS. Unfortunately, configuration and usage of this feature isn't quite as straight forward as it could be.
First of all, it's impossible to find documentation within the QNAP search feature on how to use this feature. I searched for terms such as USB copy, copy button, one-touch copy, and they all came up empty within the interface. After searching online, I found that in order to use the button, you have to install a new package from the App Center called HBS 3 Hybrid Backup Sync.
Once installed, bringing up the app allows you to configure what happens. You can configure it to backup to or from the NAS device, decide if it should sync data, copy data, or create a new directory for each copy. You then decide the locations that are addressed. In the example screenshots, I configured the button to copy files from the USB device to a folder called "USB Backup," and to make a new folder for each copy.
The tool creates a folder with the current date for each backup, and if you do multiple backups in a day, it appends a "-#" at the end (e.g.: -1, -2).
Using the button is a little odd. Once you put the device in, you press the button once to mount it, you press and hold the button for 2-5 seconds to start a backup, and you press and hold the button for 6-10 seconds to eject the USB drive. I guess that's good to prevent accidents, but it's not the most intuitive, although you can set a configuration within the tool to force the QNAP TS-233 to beep, letting you know the activity is starting.
This package not only has the functionality to control the One Touch Copy button, but also allows you to do a lot of other backup jobs, which is handy. If you have a Mac, you can use Time Machine to backup your device. You can also send data to an Rsync server or use the TS-233 as a Real-time Remote Replication (RTRR) server to sync between two QNAP NAS devices.
When creating backup jobs, there are many cloud options to send your data to, including Amazon S3 and Glacier, Backblaze B2, Box, Dropbox, OneDrive, Oracle Cloud, and many more. The HBS 3 app also has an integration with CloudFuze, a service that allows you to migrate data between cloud providers.
Snapshots
One thing that the QNAP TS-233 does a great job with is volume snapshots. In a nutshell, a snapshot is a point in time copy of the volume. If you accidentally delete a bunch of files or your fileshare is hit with ransomware, you can simply select a previous snapshot and everything will go back to the way it was on that day and time.
Unlike Synology's SRM, Snapshot Manager is built into QTS and works automatically, and using it is simple. From the interface, you can either restore a single file or you can actually revert to a point in time. Note that if you revert the main system volume, any applications you installed from the App Center will need to be shutdown and possibly even reinstalled, depending on what upgrades occurred during that time.
In addition to local snapshots, QNAP gives you the ability to replicate snapshots to remote devices. This gives even more protection and an easy way to restore your NAS device should you suffer a system failure and are unable to access your volumes.
Overall the process takes awhile (which is to be expected), but is a great way to restore from a catastrophic event, and is a feature that's implemented into QTS extremely well.
Containers and Virtualization
Although the QNAP TS-233 supports containers, after installing Container Station, I was greeted with a message informing me that it requires a minimum of 4GB of memory. Since the NAS device itself does not support more than 2GB of RAM, you won't be able to run any custom workloads, although the app does not explicitly forbid it.
That said, even though it isn't supported, and the lack of memory and CPU will limit what you can do, Container Station does not prevent you from spinning up containers. With a few clicks on the interface, I was able to spin up a BusyBox container and get to the shell without any issues. However it's concerning that the image it downloaded was version 1.29.3, which was released in 2018. As with many third-party packages, the ones available in QNAP's (or Synology's) app store is usually old because the company can't keep up with the testing to ensure everything will work on its hardware, so you might want to download the packages yourself from Dockerhub or elsewhere.
One interesting thing to note is that starting with version 3.0 of Container Station, LXC containers are no longer supported and will require you to migrate to LXD containers. This probably isn't a big deal, since LXD containers have been around for years, but is something to make note of.
Conclusion
The QNAP TS-233 is a good device for specific use cases. If you need a small device to store files in your house, are looking for a NAS device to replicate another device to, or really like the aesthetics of your NAS devices, the TS-233 delivers. Costing less than $200, the TS-233 is a great low-price, low-power solution to your home storage needs. The snapshot functionality works great, and the easy copy button, a feature being removed from many NAS devices, is a welcome addition for specific use cases. Finally, while the performance is not exceptional, it's good enough for many basic tasks.
That said, if you want to do more than just file serving, the TS-233 is a bit weak. The ARM processor isn't going to win any speed tests, and the RAM being fixed at only 2GB means you'll be hard pressed to run many extra services on the device. It's also disappointing that there is no easy access to the drives, although if you have little ones in the house, this could be seen as a benefit.
Despite its flaws, for the market the QNAP TS-233 is addressing, it's a perfect fit.


6 Comments - Add comment
Advertisement